Thursday, May 24, 2012

Testing your Fate


It is time to cook some of your favorite muffins or bread and you look at the recipe to see that you need baking soda. You thinking, " Baking soda. Baking soda...do I even have that?  I have baking powder" (NOT the same!!) Then you look in the fridge--I don't know why that's were I always look first. Then fly through cabinets when you have your "Aha! Found it" moment. 
Getting caught up in all the excitement you forget to do one thing- see if it still works anymore. Yes, sadly that powder does expire and it shows in the results, but not on the box. So to avoid the dense muffin bricks you need to check and see if it is still good!

This is super easy and is WAY better than wasting an entire batch of muffins (or whatever it is you may be baking) before the guest show up. 

Step One: Stir in 1/4 teaspoon of powder into 1/2 cup or so of very HOT water.  
Step Two: Watch! Seriously. The soda will immediately start to bubble if it's still good. If you do it on the stove and the water is boiling, make sure that it is not the boiling water that is what you see as "bubbling". 
Baking soda needs an acid to get a reaction, so use the same method for baking powder but add 1/4 teaspoon of vinegar to the water before water before adding the soda. As before, if it bubbles up, your soda is fine to use.
If you don't see bubbles, then sadly you'll need to take a trip to the store and buy a fresh box! If there isn't much fizzing, your ingredients have bit the dust. 
I hope this saves you time and disappointment! Let me know what you think!
And remember.. Always keep your Pie Hole full!
Yours truly, 
M

Monday, May 21, 2012

Mock-Up Monday- Laundry Detergent

Ok PL Follower! I am now going to be postings, EVER Monday, detailed descriptions of "Pinterest Projects" that I tackled over the weekend. I will be taking common ingredients I normally use for baking and "bring 'em out of the kitchen". Meaning I will show you how certain cooking appliances and ingredients can have multiple purposes!  I will also revel to you the troubles I run into when preforming these task (that they may not tell you about on the Pinterest postings)--what you can do to make it easier, how long it took, ect. So I hope that you can find these "Monday Mock-ups" helpful!
.                                                                                                                                    .


This weekend I decided that I was going to make my own laundry detergent! I thought that it was time that I realized the health benefits and the satisfaction that comes from knowing you can make your own household "staple" items. So I went on Pinterest and found some great ideas, and narrowed down to a powdered lavender detergent. So I tried it! Hope you like it...

First thing that I had to do was look and see all of the items I needed to gather to get this party started. 

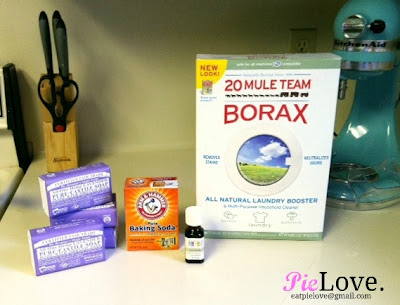
Here is what you need: 
-Entire box-Borax (72oz)
-4 bars of Lavender Castile Soap (4oz ea.) You can also get different scents!
-8 boxes Baking Soda (18oz)
-3 tbls Lavender Oil (you can get whatever scent you want, I just love lavender)


I found the Castile soap tricky to find, but all you need to do is go to a natural food store (Whole Foods, Village Foods) and you should not have a problem. These stores will also have the oils that you will need. As for the Borax and baking soda, you can find that at any chain or local store.

Now that you have your items, lets go through the EASY 5 steps.

Step One: Grate the 4 bars of Castile soap. This is not as easy as it might sound. It took me about 30-35 to grate each bar. (But it's TOTALLY worth it)


I used a cheese grater and it worked just fine.


 I tried two different ways (between the legs--dumb idea or on the counter like a normal person) to grate faster, but I found that holding it upright on the counter worked best. But my fiance bought my a Ninja for my birthday and I probably should have used that! (note to self)

SIDE NOTE: I found grating four bars of soap to be obnoxious, and the stupid grater cut the ends of my fingers and knuckles. So wear some sort of glove or use a fancy grater that does not hurt you.  When you are in the middle of the third bar just repeat multiple times "This is worth it"..it helps.

Step Two: Now that is over with, it not the easy part. Find a jar or container that is about 2 to 3 gallons. OR  you can make half a batch at one time (this is what I did) You will not put the soap into the container and add the ENTIRE box of Borax (if you;re doing 1 full batch)

Step Three: You will now add 8 boxes of Baking Soda ( these are surprisingly cheap so this was not "breaking the bank"). I usually use baking soda for cakes and certain crust. 

Step Four: Now add in the 2 tbls of your desired scented oil. 


Step Five: Put the lid on your container and shack it up for about 30 seconds. Then do some laundry. I know you can hardly wait ;)

I hope that you find this helpful and fun to do! 

And remember..Always keep your Pie Hole Full!

Your's Truly
M


Friday, May 18, 2012

Funky Friday--Homemade Buttermilk?

Have you ever found yourself in the middle of a fabulous recipe, and everything is buppin' along until... You look at the the recipe twice and think, "Buttermilk. This stupid thing calls for buttermilk!".."I don't keep buttermilk in this house (after all, I am trying to watch my figure)." 

Well don't fret, I have just the fix for you! It's as simple as a lemon and regular ol' milk. 

All you need in the amount of regular milk that your recipe calls for buttermilk AND lemon juice. 

Step One: Get the milk measured out and get your lemon (for bottled lemon juice)


Step Two: For every 1 cup of milk, you will need 2 tsp of lemon juice.

1 cup of milk= 2 tsp. of lemon juice


Step Three: You will now pour the lemon juice into the milk and let it sit for 15 to 20 minutes.

Step Four: After letting your, now  buttermilk sit, you can add it into the rest of your recipe and enjoy the (HEALTHIER) finished product!


And remember..Always keep your Pie Hole full!


Thursday, May 17, 2012

What did you put on those?

Have you ever spent multiple hours either thawing frozen strawberries or picking plump homegrown strawberries; while thinking to yourself, "Man, these strawberries are going to be SO good in my tarts (or shortcakes, or maybe pie)". You may have gotten the dough ready, measured out the exact amount of sugar and flour that it calls for, and when you took your first bite of the deliciousness all you could think of was, "This is so bland that if I didn't bake this myself, and it wasn't red I wouldn't have even known what fruit this was!" 

Well all I have is one word. Pepper! Well two words..cracked pepper. If you want the wonderful taste of your strawberries to POP and be the showcase for your party or just a night at the house, all you have to do is add pepper! (weird, I know.) This will allow the flavor of the sweet strawberries to come alive with the opposing taste.

What you need to do....

It's pretty simple really. 

Step One: Get out your strawberries.


Step Two: Get your pepper out.


Step Three: Now that you have the only to items you need, all you have to do is measure out. 

NOTE: For ever pound of strawberries you will use 2 tsp of cracked pepper.


Step Four: You now can add them to the rest of your concoction (recipe)  OR even eat them alone. Either way, this is a great way to make your strawberries taste FRESH from the garden!


And Remember..Always keep your Pie Hole full!

Friday, May 11, 2012

Why Does it do That!

Have you ever been so excited about making a cake for a friend or  loved one and been disappointed with the outcome? You get in the kitchen, start whipping up all of the right stuff (maybe add a little extra sugar;)), and start dreaming of the creation that you are about to make. Then, right when the timer goes off and you pull your cake out of the oven and RIGHT there in the middle of your yummy cake there is a darn crack!!
 You may be making a sheet cake, and even a round cake you saw on Pinterest (my obsession); no matter the cake this trick WILL benefit you and get that bump and crack out of the way! You ready to know the secret???
Cake Strips!!
What are these cake strips you say? 
They are thermal strips that you put around your pan the get the "stupid bump" away! 

How do they work?
When a cake pan is wrapped with a moistened strip, the baking process is equalized to control the heat, so that the cake bakes evenly. The wet fabric on the outside insulates the strip to retain moisture throughout the baking period, eliminating high-rise centers, cracked tops, and crusty edges.
Your cakes will always come out moist, level, bakery-perfect. 
What if I don't have these?
Perfect! I have an alternative!! Go to your towel drawer and get out that one towel you put away before guest come over (we all have one of those), and lets put that baby to good use! 
Step One: Cut your towel into strips,long ways.
Step Two: Take some time and rejoice for getting rid of that towel.
Step Three: Now, take those strips to the sink and SOAK 'em!
Step Four: Ring them out and leave them by the sink while you go pour your cake batter(or whatever you are cooking) in your pan(s).
Step Five: Get your new pan wraps, twist them, and wrap them around  your pans. You may have to clothes pin the ends together (to well insulate the cake)

NOTE: If it is a large pan, you may have to clothes pin more than one towel together.
Step Six: Pop your cake in the oven, and continue with regular routine!!
Now, go try this out and kiss that crack good bye!

And remember..Always keep you Pie Hole full!

Thursday, May 10, 2012

Not for the Dishwasher-Chocolate Bowls


I have been obsessed with these ever since I discovered them! It is a fun and EASY way to spice up your ice cream parties or birthdays! Here is the video. Watch and be enlightened!


And remember..always keep your Pie Hole full!

Making it Work!

Good Thursday morning Pie Love Lovers! **Just a warning**(This post does not deal with pastries, but it HAS to be shared) 


Last night I had the opportunity to try a brand new recipe for Chicken Cordon Bleu and cook for some great friends. However, as I started to get the chicken ready I realized there was a problem. I have recently moved and I could NOT find my meat tenderizer (which was necessary for this meal). Therefore, I racked my brain...then spotted my hammer that I just used to hang frames. I know, I know, not the most sanitary item in the kitchen, but it had me thinking. I took my hammer and decided to wrap cellophane around it (so the sharper edges would not brake through the chicken's bag) and see what could be done.  And I'll be darned, it WORKED. Not just worked, but worked fantastically and we were able to share a great meal..if I do say so myself.
            As good as it worked, I will still continue to unpack and look for my dang tenderizer. But for all of those people who find themselve in the kitchen and in a jam, I hope that this helps you out! The hammer is breaking it's way out of the tool box!


Wednesday, May 9, 2012

DAY ONE of the Pastry-Pie Lovers Blog!

Pie Love is in the middle of trying to iron out all of the details of our website. BUT, in the meantime I, owner: Morgan Allen wanted to have a place where PLers can contact and interact with us at anytime! By starting this blog I will be able to keep you connected with the growing of Pie Love Bake, share tips and tricks, and keep you up to date on all our events. I hope that we can all enjoy this ride together!
And remember..Always keep your Pie Hole full!